One of the most important tasks in the security event log analysis is to find out who or what logs your system on. Here I will explain how Event Log Explorer helps you to solve this task.
First, you need to make sure that Windows security auditing is enabled for logon events. You can do this using Local Security Policy or Group Policy, depending on your network environment.
Read more about Windows Security Auditing at http://eventlogxp.com/essentials/securityauditing.html
Open Security event log with Event Log Explorer. As a rule, you will get too many different events, but now we are interested in events with the following Event IDs:
| 4624 | An account was successfully logged on |
| 4625 | An account failed to log on |
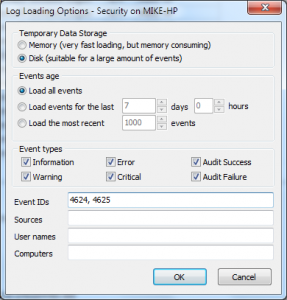
There are several ways to filter events by Event ID, I prefer using Log Loading Filter:
From the main menu select View->Log Loading Options and then in Event IDs filed type
4624, 4625
then press OK.
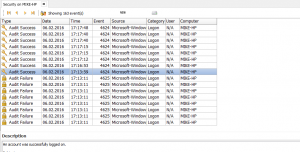
Now you can see only several interested events, but it is still not very clear. User column displays nothing for both successful and failure events (in fact, User column is useless for Security log since Windows 2008/Vista).
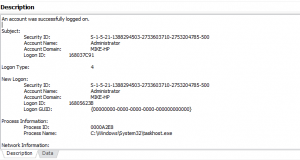
All the event details are available in the event description:
One of the advantages of Event Log Explorer is Custom Columns feature. It lets you extract information from the event details and display it as a column in the event list.
Let’s add user name and logon type to the list:
Select View->Custom columns from the main menu
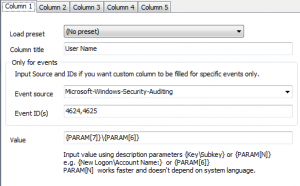
Adding User Name:
Give a name of the column (e.g. User Name)
You can set Event source to Microsoft-Windows-Security-Auditing and Event ID(s) to 4624, 4625, but since the log already filtered by these parameters you may leave these fields blank.
Now you should set Value.
There is a difference in event description between events 4624 and 4625:
New Logon:
             …
             Account Name:              Administrator
             Account Domain:            MIKE-HP
Account For Which Logon Failed:
             …
             Account Name:              Administrator
             Account Domain:            localhost
So, Account Name or Domain cannot be referenced by name, but fortunately they have the same index number, so we can reference them by index:
type
{PARAM[7]}\{PARAM[6]}
In Value field.
Adding Logon Type
In Custom Columns dialog switch to Column 2.
Give a name of the column (e.g. Logon Type).
You may leave Event Source and Event IDs empty.
Type {Logon Type}
in Value filed.
Press OK in Custom Columns dialog.
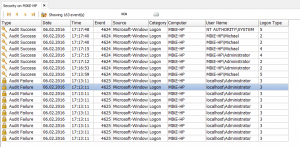
To make the view more perfect, remove useless User column:
Select View->Configure Columns and switch User off.
Now you can see that we have several successful interactive logons (Logon Type=2), two logons by a service (Logon Type=5) and a lot of failed logon attempts with Logon Type = 3 (Network logon).
Let’s check from which computers somebody tried to connect to our host:
Select View->Custom Columns from the menu.
Switch to Column 3
Give a name of the column (e.g. Remote Station).
Set Event IDs to 4625 (we need this information for invalid logon attempts only)
Type {Network Information\Workstation Name}
in Value filed.
Now we can find an invalid logon attempt from a remote workstation, but we also found many network logon attempts from our local computer.
Security event log contains information about the process that attempted to logon. We can also display it as a custom column:
Select View->Custom Columns from the main menu.
Switch to Column 4.
Give a name of the column (e.g. Caller Process).
Set Event IDs to 4625 (we need this for logon attempts only)
Type {Process Information\Caller Process Name}
in Value filed.
So, now we can see which local processes tried to logon the system as Administrator, from which workstations users tried to logon our system and who and when logged on successfully and other logging on details.

